Seats and activations
When you purchase Superluminal, you create an account that contains a certain amount of seats. Seats work essentially like Named User Licenses: each seat maps to a single user that can use Superluminal. Before a user can activate Superluminal on their PC, they need to join the team. Joining the team can be done by invitation, or by logging in through Single Sign-On.
Once invited, they will occupy a seat as soon as they activate Superluminal on their PC. If an invited user does not activate Superluminal, no seat will be occupied. This has the benefit that you can invite other admins to the team for administrative or billing purposes, without them occupying a seat. A seat can be freed by removing the user on the users page.
Each user can activate Superluminal on three machines for their own use*. This enables the use of Superluminal, for example, at the office or on a home machine when working from home. In case a machine got reinstalled or is replaced by another machine, you can deactivate the old machine so that it doesn't use one of the three user activations anymore.
*For site licenses, users can freely activate Superluminal on any device within the studio.
Accounts
Teams
When you create your Superluminal account for the first time, a team is created for you. The name of the team is either your company name, or it is automatically named 'Personal' in case you purchased the Personal plan. Generally you will only be part of a single team. However, it is possible to join multiple teams with a single account. For instance, you might have purchased a non-commercial Personal plan, and later, you are invited to join your company's team, which uses the same email address. In such cases, when you log in, you will be presented with a team select page:

After you have selected a team, you will then be logged into that team. It is possible to switch teams from the Dashboard as well:
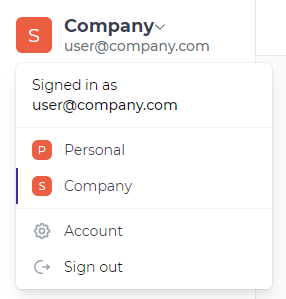
By having multiple teams, it is possible to have activations for multiple plans on a single machine. This is particularly useful for Work From Home scenarios where you have a separation between your home use and your work use. You can have two different Windows users on the same machine, one for your personal use, and one that you use for your work. If you log into Windows using your personal user, you can activate your Superluminal Personal team. When you log into your Windows user that you use for your work, you can activate the commercial team that was purchased by your company.
You can change your email address on the Account page:
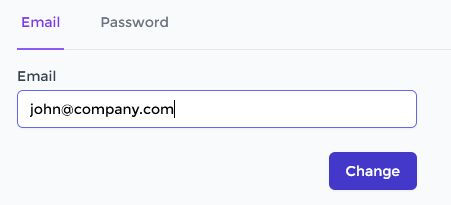
If you are the primary admin for the team, this will also change the email address of the primary admin. All notifications will be sent to the updated email address.
Password
Accounts generally go through a regular sign in process, where an email and username is provided. In these cases, you can change your password on the Account page:
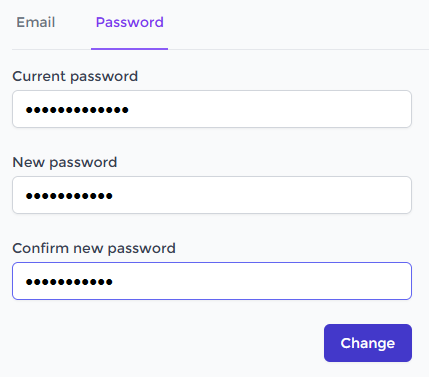
It is also possible that you only ever logged in using Single Sign-On. In that case, your account is bound to the email address that was configured in your SSO solution, but it has no password. It can be convenient to add a password to your account in these situations. For instance, if you like to use the same email address to purchase a Personal plan for home use, you will need an account that has a password set. You can add a password on the Account page:

Subscriptions
When you have purchased Superluminal through our website using a creditcard, your subscription will automatically renew at the end of each cycle. If you've purchased by requesting a quote, see Quotes.
Cancelation
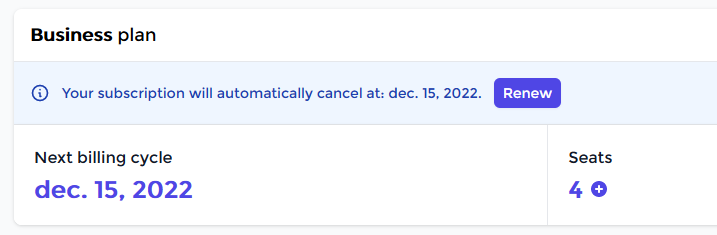
On the Plan and Billing page, an Admin can cancel the subscription at any time by pressing the 'Cancel Subscription' button:

When canceling the subscription, Superluminal will remain usable until the end of the cycle. After cancelation, you can easily undo the cancelation while the subcription is still active by pressing 'Renew':
This will undo the canceling operation without going through any new purchasing process.
Adding Seats
To add seats to your team, simply press the 'Add' button next to the seat count:

This will open up a window where the amount of seats can be selected. Here you can see the prorated costs for the additional seats that will be charged directly, as well as a preview of what you will be paying at the next subscription cycle:
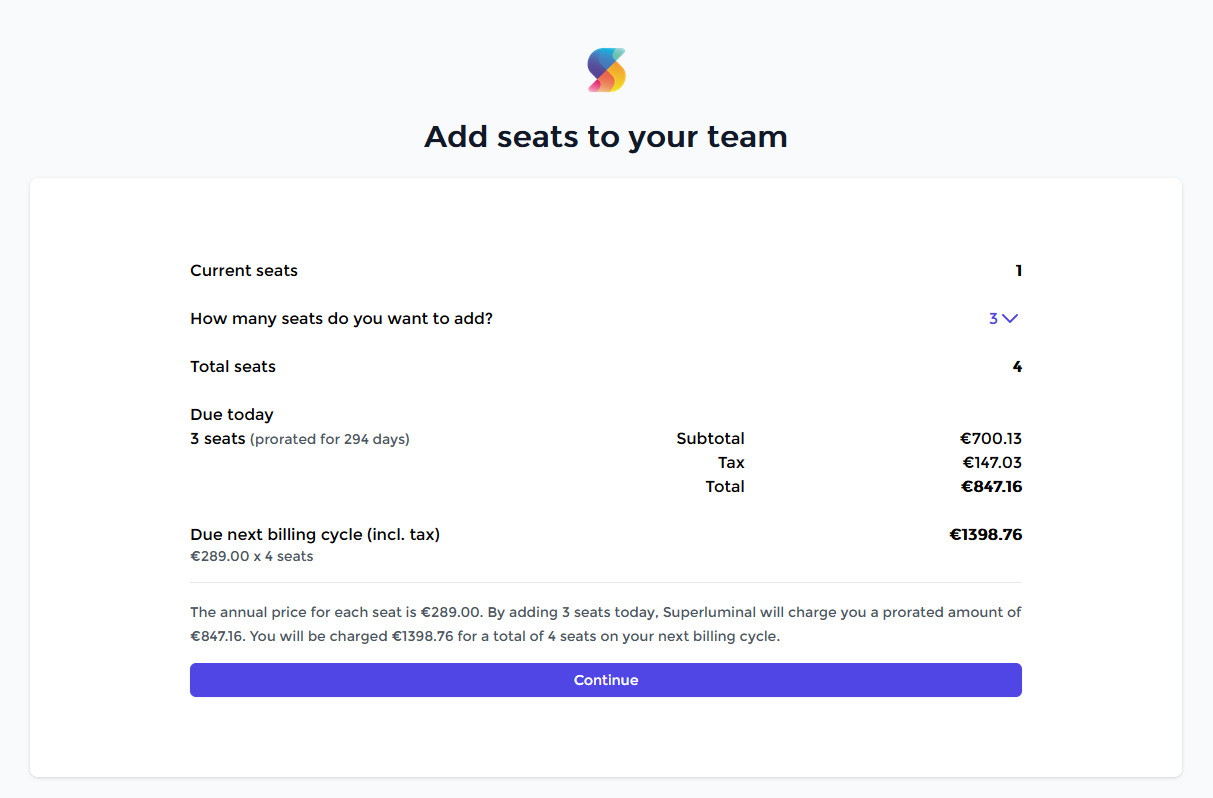
After pressing 'confirm', the purchase will complete, and the amount of seats are directly added to your team.
Changing Seat Count
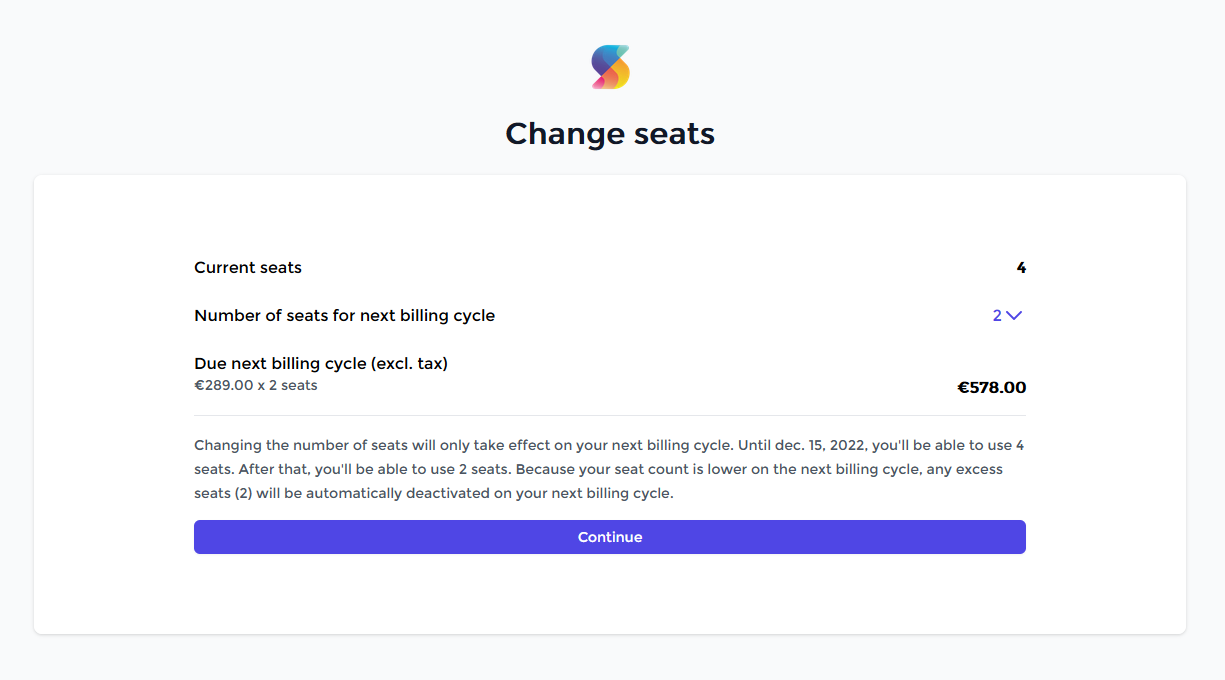
To add seats directly to your team, see Adding Seats. If you would like to remove seats from your team, you cannot do this directly because that would deactivate seats that you already purchased. Instead, you can set the seat count for the next cycle to a specific number, allowing you to upgrade or downgrade when the next cycle begins. Go to the Plan and Billing page, and press the Change button:

This will show you a preview of what you will be paying on the next subscription cycle. When the subscription cycle ends, any excess seats that were activated will be deactivated:
After confirming, you can easily update or undo this operation on the Plan and Billing page:

When pressing 'Reset', the operation is undone and all currently active seats will renew on the next subscription cycle.
Quotes
Requesting an initial quote
As explained in the Subscription section, a purchase that was made through creditcard will automatically renew on each cycle, unless the subscription is canceled. However, it is also possible to purchase Superluminal by requesting a quote first. When you request a quote for the first time, you generally do so by sending us an email or by filling in the Request Quote form on the pricing page:
.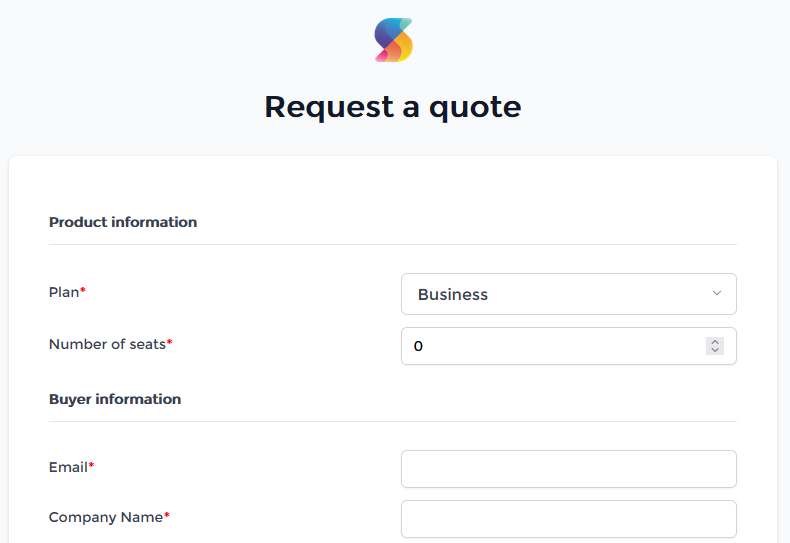
You can fill in the type of Plan, the amount of seats and your company's details. If there are any specific requests, you can enter these in the 'Notes' section. After submitting the request for a quote, we will send you an email with the quote attached. Once the quote is accepted by you, an invoice will be sent that contains a payment link. When payment has completed, an invitation will be sent that enables you to join your team.
Cancelation
When teams are created through a quote process, all future payments will also go through the same quote flow. This also means that a subscription is not automatically renewed. Therefore, there is no cancelation option: if the subscription cycle ends and the subscription is not manually renewed, the subscription will automatically be canceled at the end of the subscription cycle.
Adding Seats
When a team is created through a quote process, adding seats will also go through a quote request. Requesting a quote in this case is a simple procedure: simply press the 'Add' button next to the seat count:
This will open a window where you can quickly send us a quote request to add additional seats to the existing team:
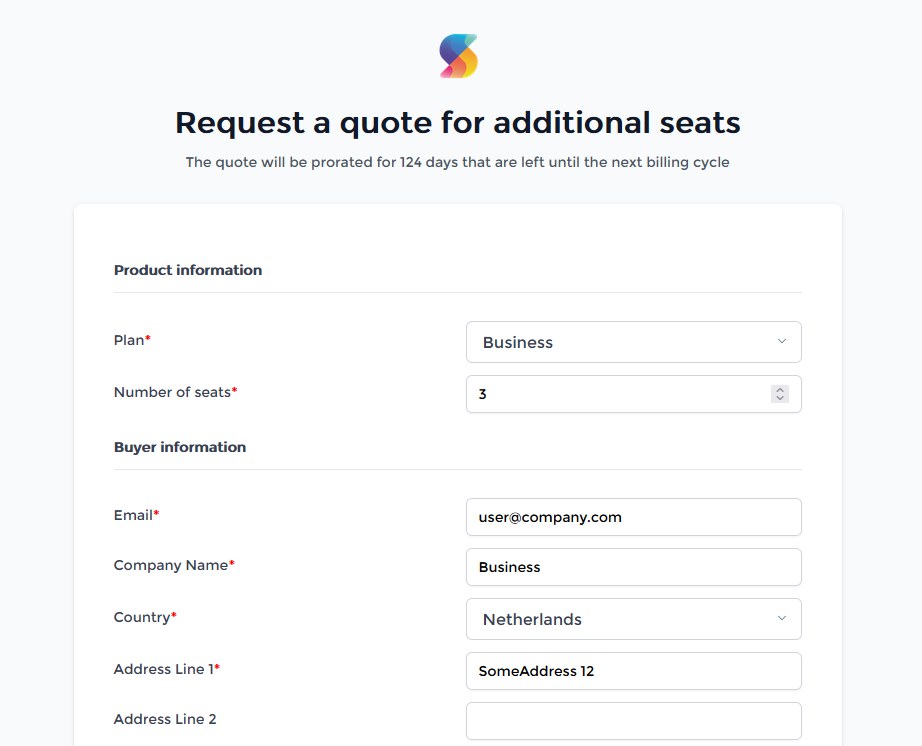
This will send us a quote request that will be prorated, as indicated on top of the page. You will receive an invoice with a payment link, and the seats will be automatically added to your team when the purchase completes.
Renewing
When your subscription reaches its renewal date, renewing is performed through the same quote process. A notification email will be sent to the primary admin two weeks in advance that you need to renew your subscription. You can click the 'renew' button in the notification email to start the renewal process. This will open up the 'Request Quote' form again where you can easily request a quote for renewal of your license.
Purchase Order Numbers
In case quotes get accepted with PO numbers, the only distinction in this process is that the PO number will be visible on the invoice, and that we immediately activate the purchase upon acceptance of the quote, so that companies don't have to wait for the payment to complete before they can make use of the product.
Users
When you have created your account and purchased your license, you are the primary admin for this team. This means you have access to all pages, including the Billing and Users page. As a primary admin, any notification emails are sent to the email address that belongs to your account.
There are two ways that other users can join your team. If you purchased the Business plan, you can invite users to join your team. If you purchased the Enterprise plan, you can set up Single-Sign On, which allows users to sign in through an SSO setup that is configured within your company. See Single Sign-On for more details on how to set up SSO.
Inviting Users
When you are not using SSO, you can invite users to your team directly on the Users page by pressing 'Invite Users':

This will open a window where you can add multiple email addresses of users you'd like to invite to your team with a specified role:
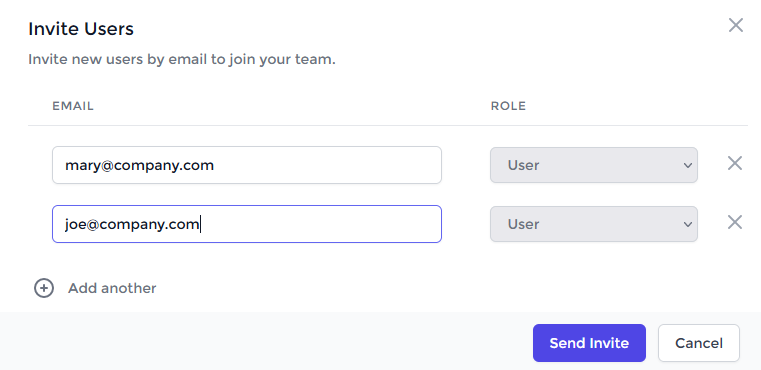
By default, the 'User' role is selected, which will give the user the opportunity to activate Superluminal, but access to the Dashboard will be limited. For instance, they will not have access to Billing information, nor will they will be able to manage users and activations. Note that if you invite users in the admin role, it will give them full access to the Dashboard, including your Billing information. If multiple admins are invited to join the team, the primary admin remains unchanged. Only the primary admin will receive email notifications regarding the subscription. The only way for the primary admin to change is when the primary admin is removed from the team. In that case, the currently logged in admin will become the new primary admin.
After you have invited users to your team, you can see the pending invites on the Users page:

Here you can try to resend the invite in case the email was accidentally deleted, or you can revoke the invite entirely.
After users are invited, they'll receive an email to setup a Superluminal account. Once the account creation is completed, they will join your team automatically.
Removing Users
Once users have successfully joined the team, they are visible on the Users page:

For each user, you can see the last time that Superluminal was used, and the number of machines Superluminal was activated on.
By clicking 'Remove', the user is removed from the team, and any activated machines will be deactivated, freeing up a single seat.
Activations
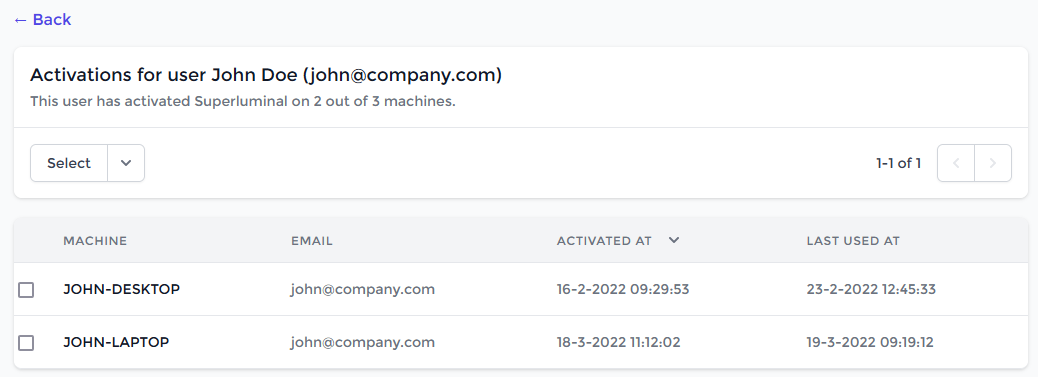
Once users have been invited to your team or logged into your team using Single Sign-On, they can activate Superluminal. See the Superluminal documentation for how to activate Superluminal. A user can activate up to three machines. The Users page will display how many machines were activated per user:
To see what machines a user has activated, click on the text displaying the activation count. This will display a list of all activated machines for that user:
In situations where a machine is not accessible anymore (for instance, because it got reinstalled), it is possible to deactivate a machine by clicking the selection boxes, and then pressing the 'Deactivate' button:
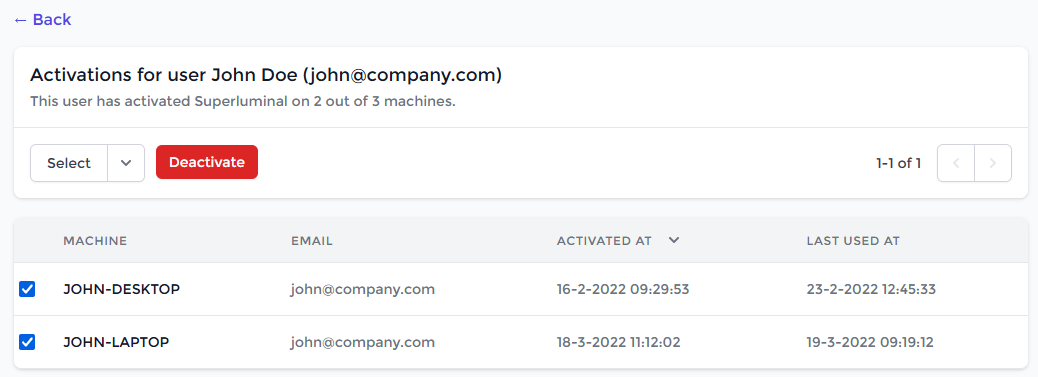
This will free up a single activation for that user, so that another machine can be used instead.
Single Sign-On
Single Sign-On is a feature that is accessible for companies that purchased the Enterprise plan. It allows your team to sign in to Superluminal using the account from your SAML 2.0 Identity Provider, such as Azure, Okta, OneLogin or your custom SAML 2.0 solution.
If you run into any issues with configuring SSO or need support, please contact us.
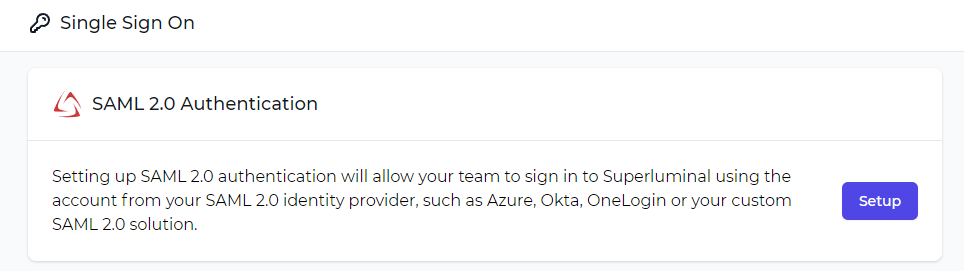
Enabling SAML 2.0
SAML 2.0 SSO can be enabled by going to the Single Sign On page on the Dashboard and pressing Setup.
Configuring SAML 2.0
Once SAML 2.0 is enabled, you'll be presented with the following screen, which can be used to configure SAML 2.0:
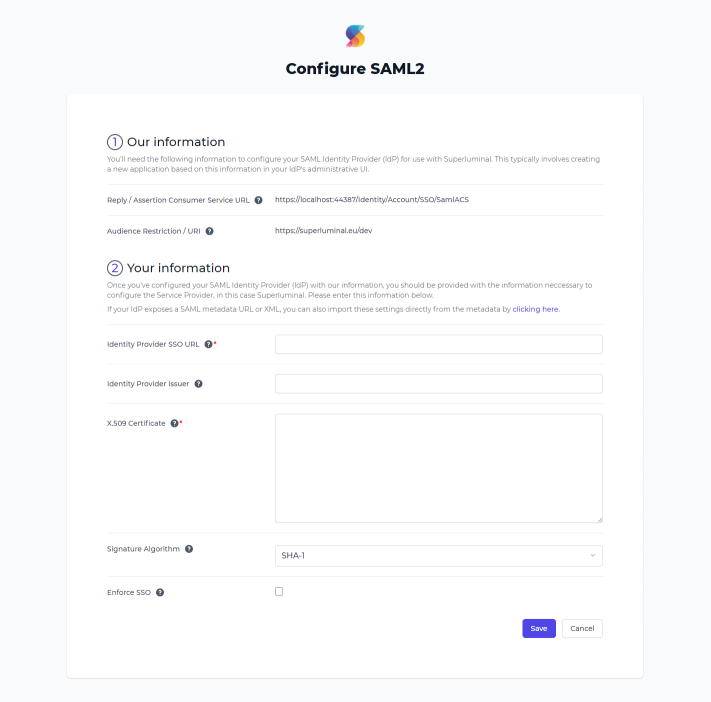
This screen is divided into two sections. The section at the top contains our information which you'll need to configure your Identity Provider. The following information is provided:
| Property | Description |
| Reply / Assertion Consumer Service URL | This is the URL that the user should be redirected to once they've successfully signed in to your Identity Provider |
| Audience Restriction / URI | This is the unique ID that identifies Superluminal to your Identity Provider. It may also be called Entity ID or Issuer ID in your Identity Provider's configuration |
The next section at the bottom can be used to configure Superluminal with information from your Identity Provider. We'll use this information to verify that sign in information sent to the Reply URL actually originates from your Identity Provider.
The following information will need to be provided by your Identity Provider:
| Property | Description |
| Identity Provider SSO URL | The URL in your Identity Provider that the user should be redirected to when attempting to sign in to your team |
| Identity Provider Issuer (optional) | The ID that's used to identify your Identity Provider. It is used to verify that responses sent to the Reply URL originate from your Identity Provider. If provided, it should match with the one that's provided to you by your Identity Provider, otherwise SSO will fail during SAML response validation. |
| X.509 Certificate | The X.509 public certificate that should be used to verify SAML responses from your Identity Provider. |
| Signature Algorithm | The algorithm that's used to verify the signature of SAML responses. This must match the algorithm that's configured in your Identity Provider. If the signature algorithm doesn't match, SAML login responses will be rejected by our server. |
| Enforce SSO | When enabled, non-admin users can only sign in to your team through SSO. Admins will still be able to sign in through email/password. |
The information that should be entered here is specific to your Identity Provider. For more information on how to retrieve this configuration, please see our SAML 2.0 Configuration Guides.
SAML 2.0 Attributes
In order to correctly set up accounts in our system once users log in via SSO, it's helpful for your Identity Provider to provide information about your users to our system when their SAML login completes. This information can be communicated back to our systems via SAML attributes. Some attributes are required, while others are optional.
The following attributes are supported, and should be configured in your Identity Provider:
| Attribute name | Required | Description |
| user.email | Yes | The email of the user that should be associated with their SSO login |
| user.firstName | No | The first name of the user. If provided, this will be displayed on the Users page and in Superluminal |
| user.lastName | No | The last name of the user. If provided, this will be displayed on the Users page and in Superluminal |
Enforce SSO
The Single Sign On support can be configured to only allow sign in through SSO.
SAML 2.0 Configuration Guides
We've written guides on how to configure SAML 2.0 for the following Identity Providers:
If your Identity Provider is not in this list, please consult your Identity Provider's documentation on how to retrieve this configuration. If you run into any issues with configuring SSO or need support, please contact us.Okta Setup
The following section describes how to configure Okta for use with SSO in Superluminal. It assumes you've already set up your Okta account.
Create Okta Application
- Login to the Okta dashboard
- Go to the
Applicationssection in the Okta dashboard - Click
Create App Integration - Select
SAML 2.0from theCreate a new app integrationwindow that pops up and clickNext.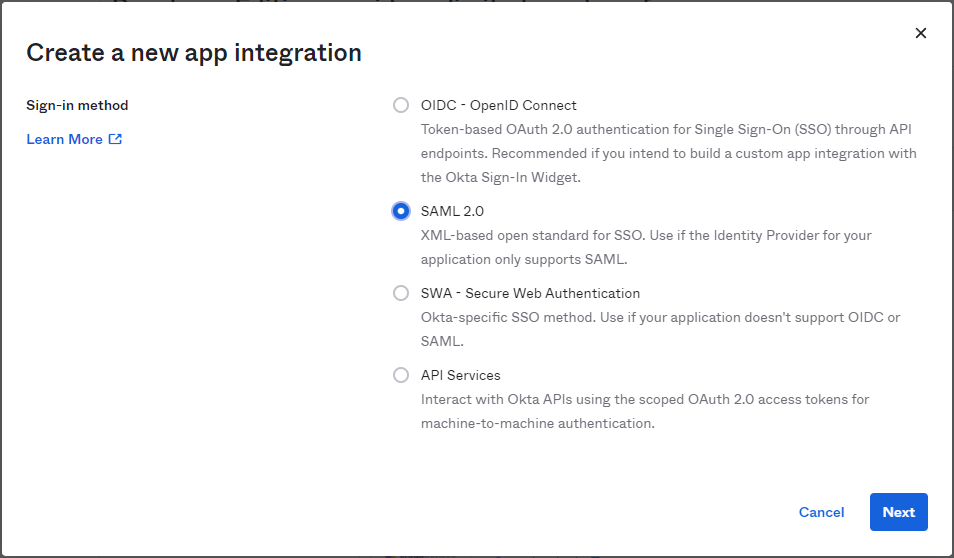
- Under
General SettingsspecifySuperluminalasApp name. If desired, you can use this logo as the logo for the app. ClickNextwhen done.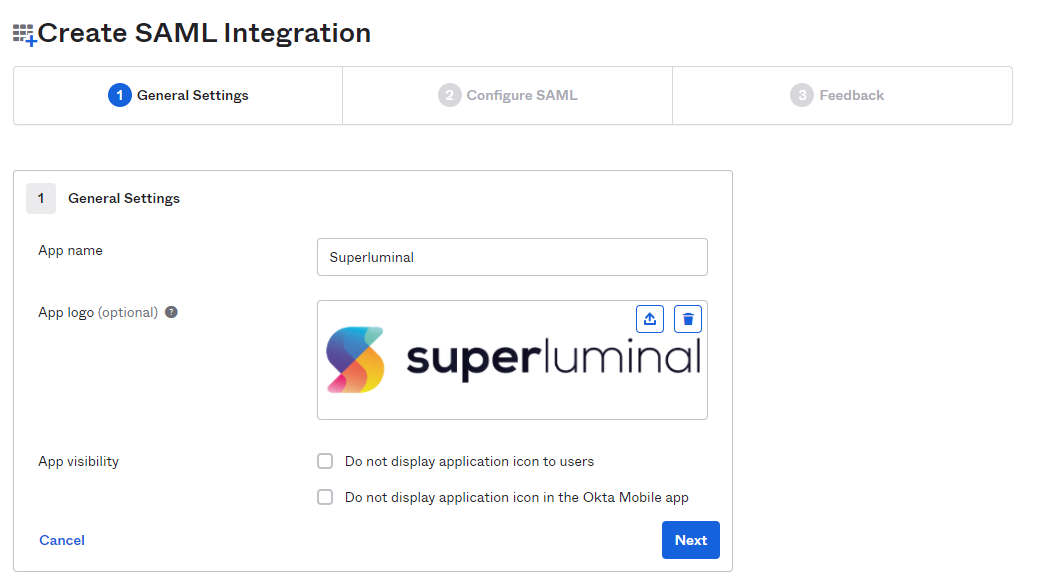
-
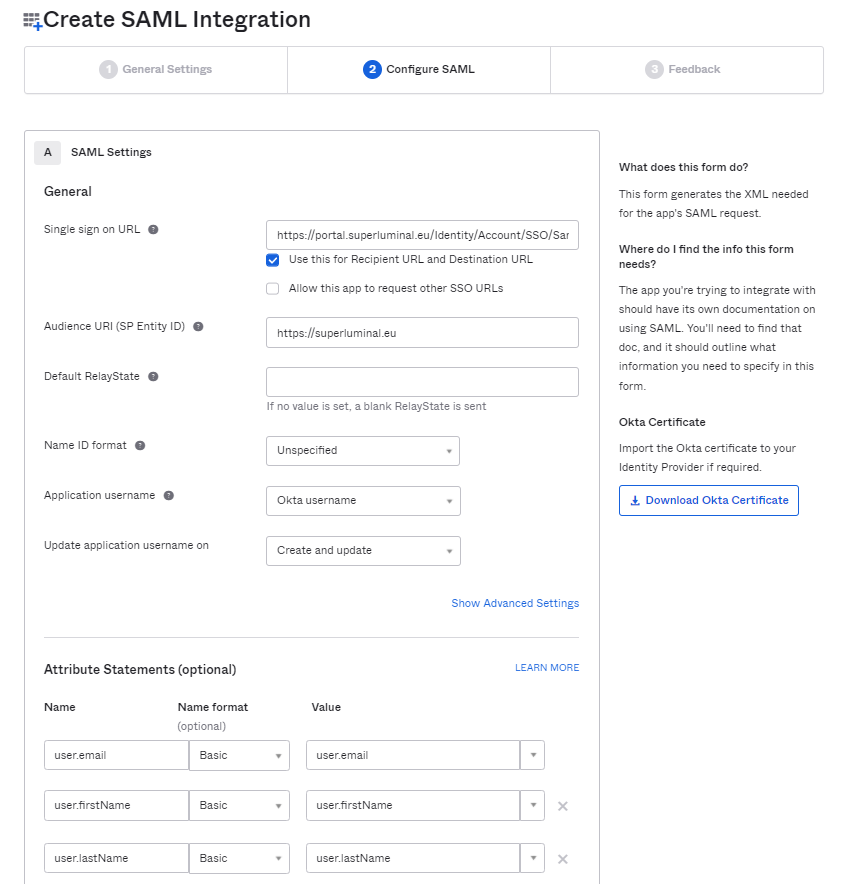
Under
Configure SAMLspecify the following properties. Note that you can leave the other properties at their defaults. ClickNextwhen you're done-
General
Property Value Single sign on URL https://portal.superluminal.eu/Identity/Account/SSO/SamlACS Audience URI (SP Entity ID) https://superluminal.eu -
Attribute Statements
Name Format Value user.email Basic user.email user.firstName Basic user.firstName user.lastName Basic user.lastName
-
General
-
After completing the
Add App Integrationwizard, the application will be created. You can now assign users or groups to this application through theAssignmentstab of your application to allow them to sign in to Superluminal using their account. -
As a final step, find the
Identity Provider metadatalink under theSign Ontab of your application and copy or note down the link; you'll need it to complete SSO setup in the Dashboard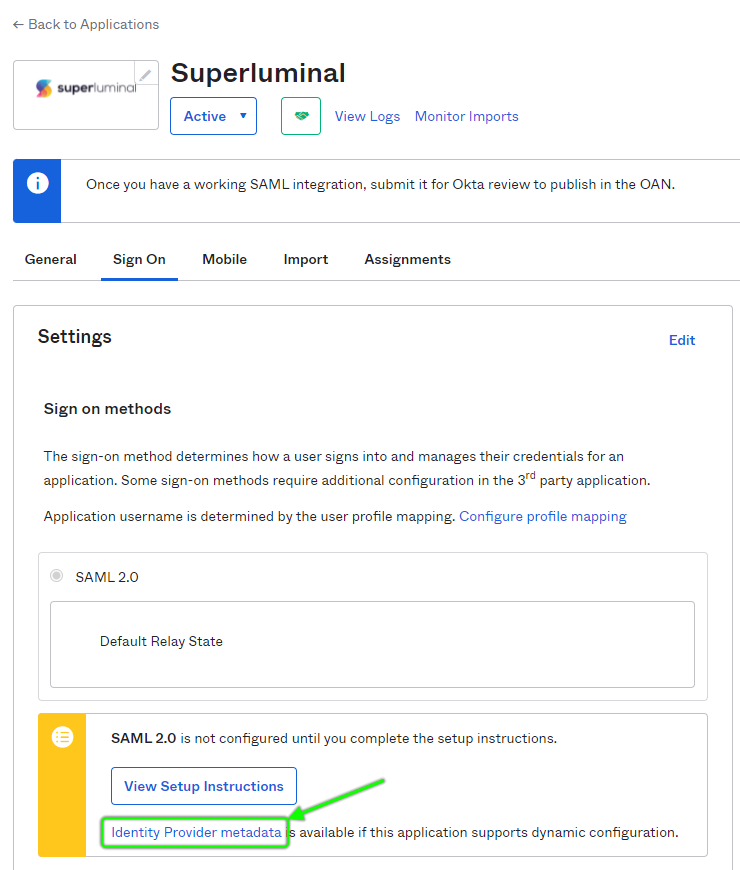
Configure Superluminal
- Go to the Single Sign On page on the Dashboard
- Click on
Setup - On the Configure SAML2 page, find the link to import SAML2 settings under the
Your informationsection and click it
- On the
Import SAML Configurationwindow that pops up, enter the metadata URL you copied from Okta and pressImport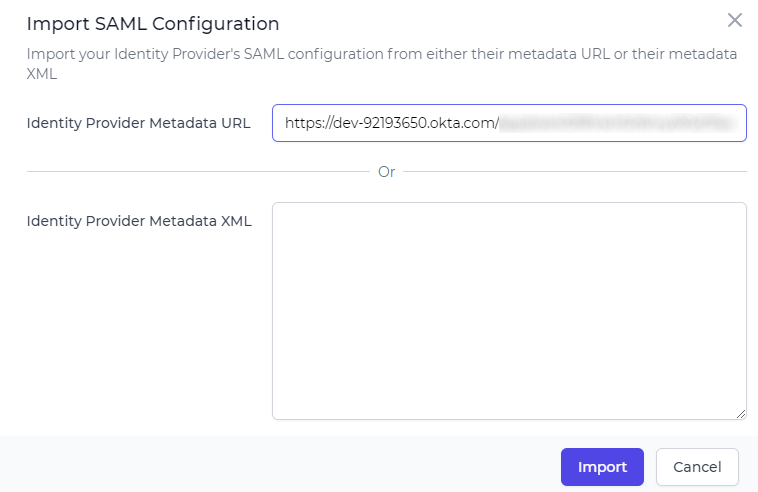
- Once the import completes, change the
Signature Algorithmto match what you selected when creating the new App Integration in Okta. If you haven't changed it, set this to SHA-256, which is the default for Okta - Press save to complete the setup. You should now be able to login through SSO with your email address or domain.